What we do here
This page attempts to show how easy it is to make a mobile app with LiveCode.
Be warned: you will not see an award-winning design! The idea is to demonstrate how little you need to get something working. From there you can go on to make a visually-dazzling app if you wish, but that is not my goal.
What we need
- Obviously we need a mobile device, and one that has a built-in magnetometer. In my case I have a Samsung Galaxy Note:
This implies we will work with Android, but the same code would run just as well on iOS.
- We need a computer for writing the app; in my case I have an Apple MacbookPro.
- We need a USB cable to connect the two.
- We need a LiveCode installation. That is a single application file.
- We need to use the Android program libraries, those are free and easily downloaded from Google. Unfortunately that is a folder full of weird stuff, but all we need to do is put it somewhere in our filesystem and tell LiveCode where it sits.
- Finally we need to imagine what we want the app to do.
Imagination
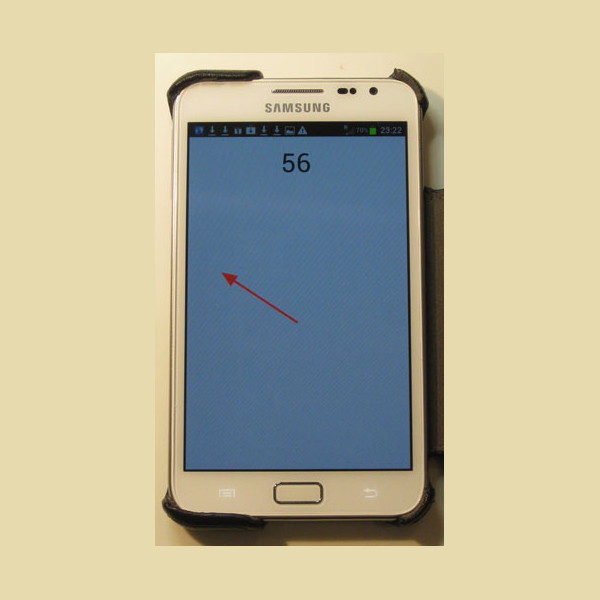
Let's be modest: imagine an arrow on the screen, and the arrow points to the magnetic North. Something like this:
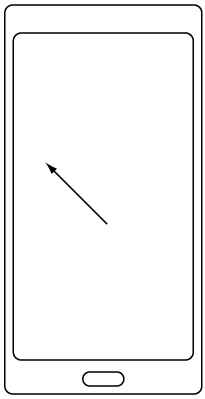
Not an award-winning app, as I said, but we can always improve, and it is wise to start simple.
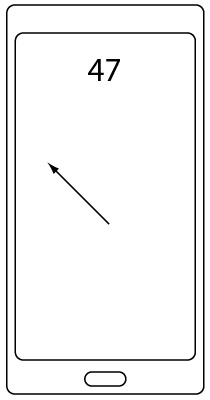
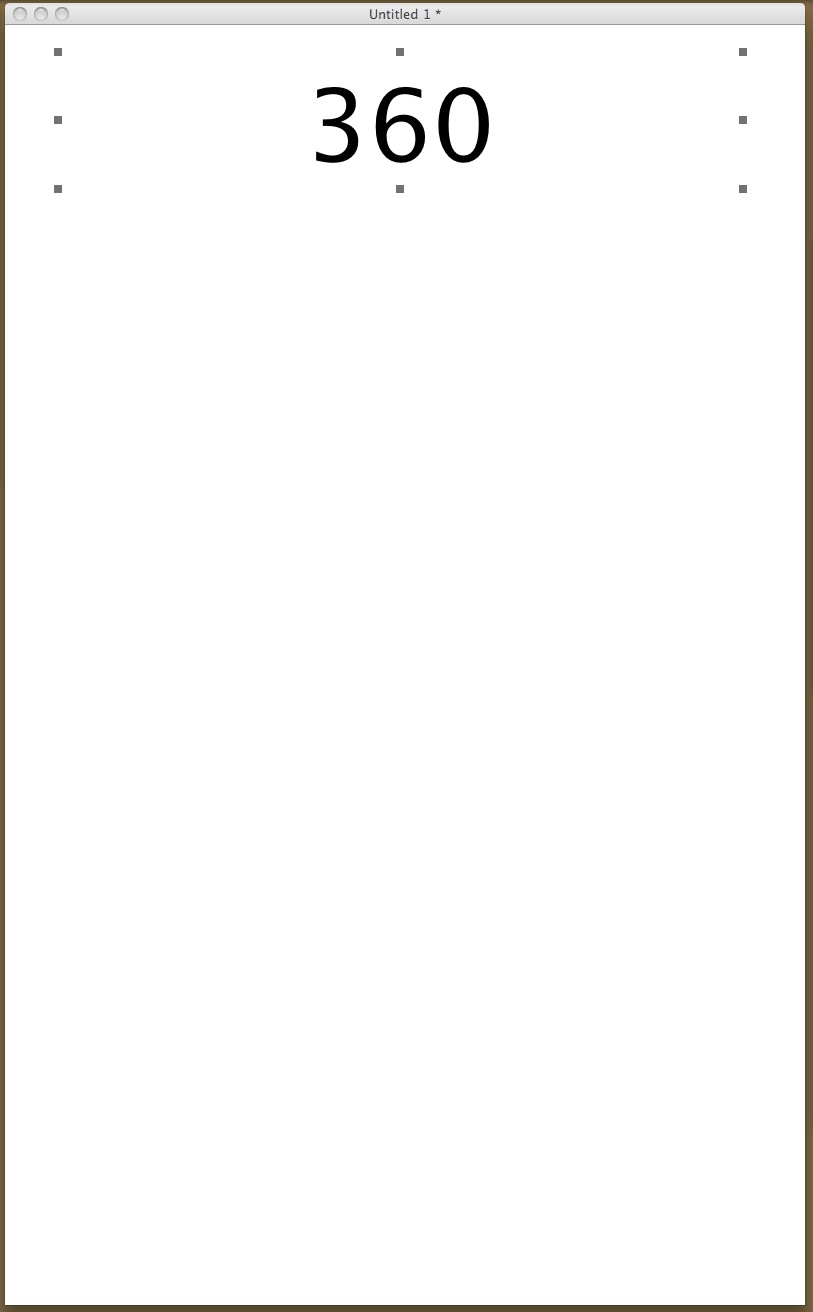
Perhaps we can add a field (text box if you like) to show the heading (direction) in which the device points:
Mathematics
There is no way to avoid looking at the hard part of the problem.
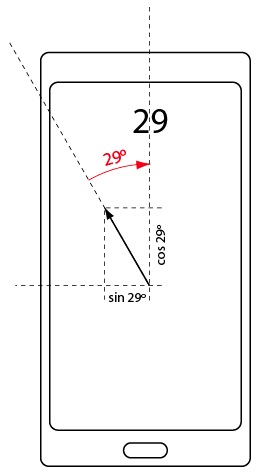
Suppose we hold our mobile device horizontally, and it points at a magnetic heading of 29º (somewhat to the East from North):
LiveCode has a polygon object, and it can be drawn with or without arrows at the end points. For the needle we will use a polygon with just two points and an arrowhead at the end. While that is a ready-made object, we still have to position it on the screen correctly.
I should first say something about LiveCode polygons: they are specified by the list of points of their vertices. For example, the points of a square of size 20 with its centre at the coordinate origin might be given as:
10,10 10,-10 -10,-10 -10,10
A point in LiveCode is a pair of expressions separated by a comma, such as 400,700 or 400-x,y+100. The list of points of a LiveCode polygon is a piece of text with each point on a line by itself.
Suppose the arrow should have a length L. One point is always fixed near the centre of the screen. The other point is at L*sin29º to the left and L*cos29º higher up.
The screen of the Galaxy Note is 800 pixels wide and 1280 pixels high. I'm going to make the arrow 300 pixels long. I'll put the fixed end at 400 (=800/2) pixels from the left and 700 pixels down (that's a bit lower than the middle, but we need some space for the heading field anyway).
The start of the arrow then has coordinates 400,700.
The tip or end of the arrow has coordinates 400-300*sin(29º),700-300*cos(29º) (remember that screen coordinates have the y axis pointing down!).
Of course this should work for any angle R, not just for 29º, so the set of points defining our simplistic polygon are:
400,700 400-300*sin(R),700-300*cos(R)
We will have to make this into text by putting a return character between the two lines, but that is for the section below on coding.
The Interface
We begin by asking LiveCode for a new stack (its term for app):
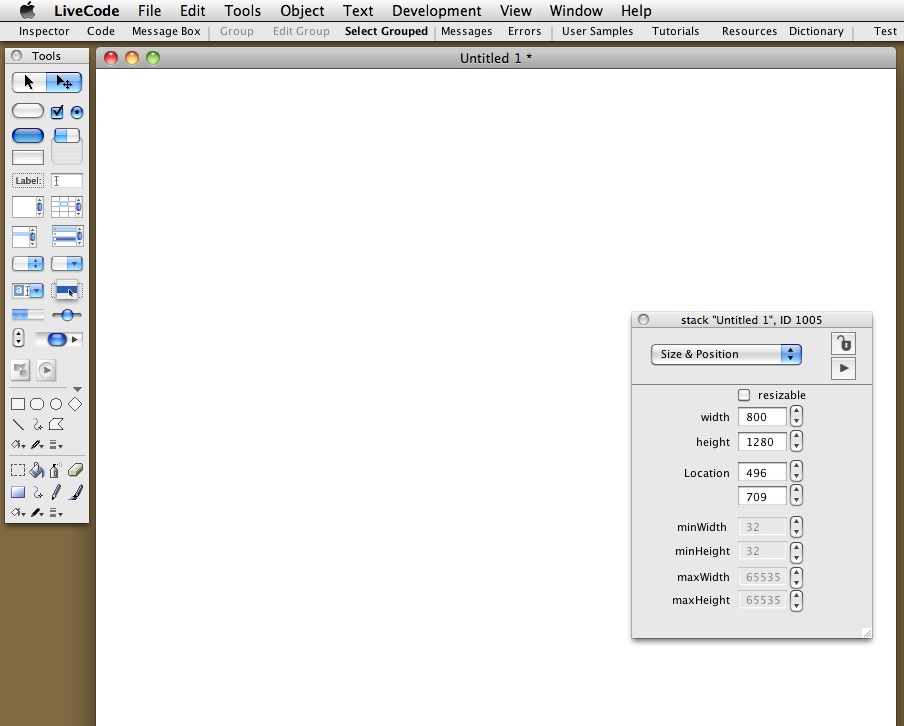
We call up the stack inspector and set the width and height (and the location so we can see all of it).
Then from the tools palette we drag a field onto the stack's window, make it large and set its properties to remove the border and display text in a large font, centred:
(the actual stack window is much larger; I have reduced it here to save space)
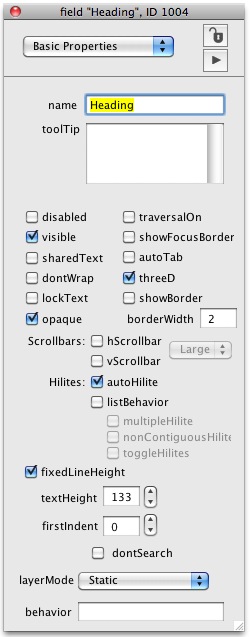
It is crucial to give a name to the field; I called it "Heading". It is also crucial to uncheck the "traversalOn property: traversalOn means it is possible to type text into the field, and that means Android will pop up the keyboard as soon as you touch the field, which is not desired in this case.
Next we select the polygon tool on the palette and click twice in the stack window to draw a line. using the inspector we set the line width comfortably thick, give the line a red colour, tick the box for an arrow at the end etc.:
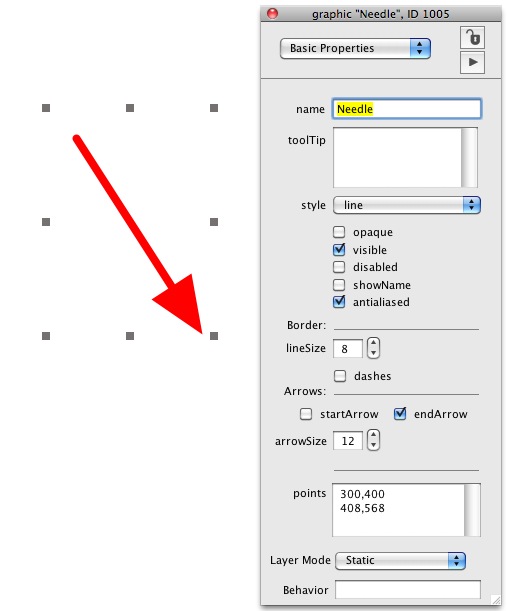
Crucial again to give the object a meaningful name: "Needle". Never mind what the points are that define it, we will set those by program code anyway.
We might at this stage also think of saving our work, say in a file called "Compass.livecode" (what else?).
Code !
Important observation: so far we have not written a single line of code. All we have done is to create a basic canvas (the stack and its window), and placed two objects on it (a text field and a polygon with two points. We have been careful enough to give the objects meaningful names: Heading and Needle.
How is this app going to work? All it needs to do is periodically to obtain the heading from the built-in hardware magnetometer and set the points of the needle to the values we determined in the maths section above.
The classic way to do that is to start a routine when the app itself starts up, and the routine then schedules another call to itself before it ends. An obvious name for the routine that does the work is IndicateNorth.
Our app then looks roughly like:
on OpenStack
   IndicateNorth
end OpenStack

command IndicateNorth
   (do something here to move the needle)
   send IndicateNorth to me in 200 milliseconds
end IndicateNorth
These are two handlers, residing in the script of the app (stack) itself. Strictly speaking the OpenStack bit is the handler for the event that occurs when the app begins, and theIndicateNorth bit is a routine (the name of which we invented). IndicateNorth is called once when the app launches, but just before its end it sends itself as a command to the app with a time delay of 200 milliseconds (this can be changed at will, but 200 milliseconds seems to work fine).
Now we need to fill in the stuff that shows us where North is. First we should activate the magnetometer; that is one extra line in the OpenStack handler:
on OpenStack
   mobileStartTrackingSensor "Heading"
   IndicateNorth
end OpenStack
Other sensors are called acceleration, location (GPS) and so on.
We could now add to the IndicateNorth command a line:
command IndicateNorth
   put mobileSensorReading("heading") into field "Heading"
   send IndicateNorth to me in 200 milliseconds
end IndicateNorth
and that would in fact display and update the heading of our mobile every 200 milliseconds. But it's no good for two reasons: one is that Android gives us the heading with far more decimals than is good for us, and the other is that we also want to use the heading for moving the needle. So it is better to round the heading to a whole number and to store it temporarily in a local variable before putting it in the heading field:
command IndicateNorth
   put round( mobileSensorReading("heading",false), 0) >into \
         lHeading
   put lHeading into field >"Heading"
   send IndicateNorth to me in 200 milliseconds
end IndicateNorth
Everyone has their conventions about variable names. I always start mine with a capital letter and prefix a lower case letter to indicate the type of thing it is, here I use l for local variable Heading, therefore its name is lHeading.
Mathematicians and most math function libraries use radians as angle units instead of degrees. We need to convert the heading to radians before we can use it in the sine and cosine functions. At last we can set the points of the needle graphic to the result of the formulae we derived earlier. Note that again we need to round the results of the trigonometric expressions in order to get whole numbers for the pixel position values:
command IndicateNorth
   put round( mobileSensorReading("heading",false), 0) into \
         lHeading
   put lHeading into field "Heading"
   put lHeading*pi/180 into lRadians
   >set the points of graphic "Needle" to \
         >400,700&>return&400-round(300*sin(lRadians)),700-round(300*cos(lRadians))
   send IndicateNorth to >me in 200 milliseconds
end IndicateNorth
Remember that the points of a polygon are specified each point on a line by itself.
We only have two points here, so there is only one return character. The ampersand signs are the character string concatenation operator.
The Final App…
Here is the final code:
on OpenStack
   mobileStartTrackingSensor "heading"
   IndicateNorth
end OpenStack

command IndicateNorth
   put round( mobileSensorReading("heading",false), 0) into \
         lHeading
   put lHeading into field "Heading"
   put lHeading*pi/180 into lRadians
   set the points of graphic "Needle" to \
         >400,700&cr&400-round(300*sin(lRadians)),700-round(300*cos(lRadians))
   send IndicateNorth to me in 200 milliseconds
end IndicateNorth
And that really is all there is to it.
Testing
To test our compass we must combine the LiveCode code with the Andriod code libraries. LiveCode has a menu item Standalone Application Settings:
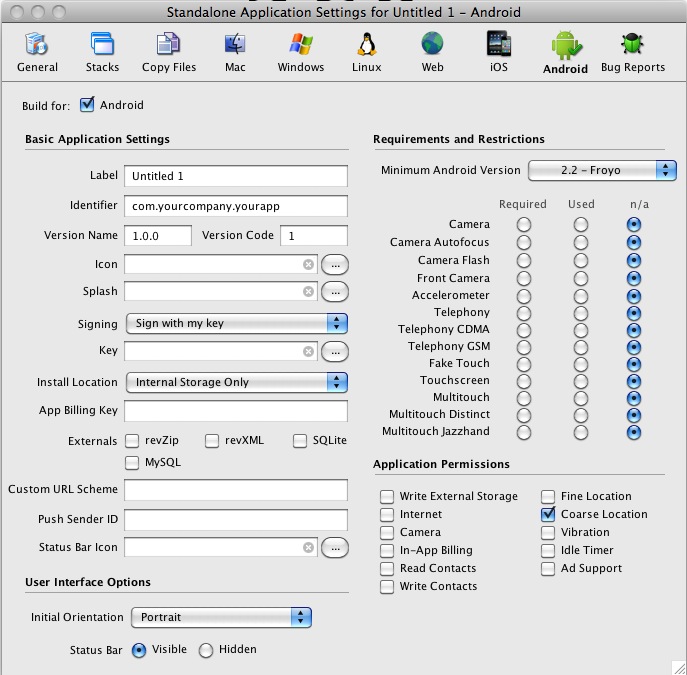
For the test we only need to check the Coarse Location permission. This is somewhat silly, because a compass does not need access to your geographical location. Unfortunately in the current Android libraries the code to access to the magnetometer is lumped with the code to access the wifi and GSM signals (coarse location). As we are not calling upon either of those, our app will function even if wifi or gsm are off.
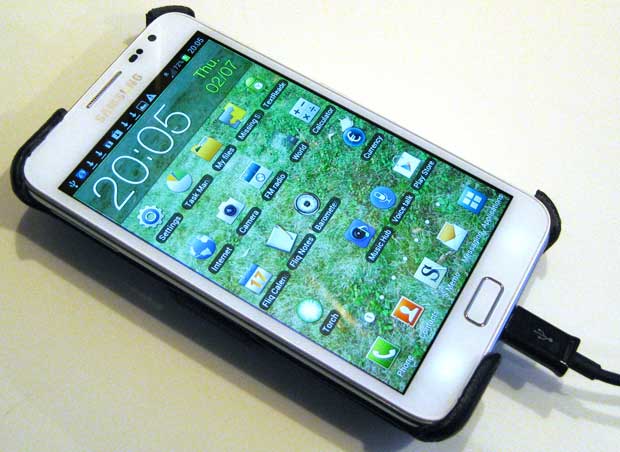
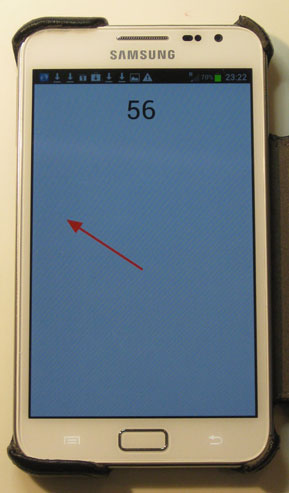
Once the standalone application settings have been given, all we need to do is connect our mobile to the laptop with the USB cable and press the "Test" button in LiveCode. A few seconds are needed for LiveCode to put everyting together and upload it, then the result is:
This app is guaranteed not to leak any personal information to the network and not to disturb you with advertising.
I have made a much more complete app, which does adapt itself to the screensize of the mobile it runs on, shows the cardinal points, and uses vector graphics. You can download it free. But you will have to trust me and you will have to set your android device to accept installation of non-market apps (in the security section of the settings).
Alternatively, you could download the source stack and look at the code. You will have some slight trouble with that, since the calls to the heading routines will not work. You will also only be able to compile it to a stand-alone and transfer it on your Android device if you install the Android Development Kit alongside the LiveCode program.
Again: much can be improved, but the point is that you get results fast using LiveCode.
Suggestions for improving the vector-graphics compass: to make it smoother we can avoid recalculating all the vector points for each change of heading by pre-computing them in an arrayPointsFor[] of 1 to 360 degree headings, then setting the points to PointsFor[lHeading] which would be much faster. It would make a bigger app, since the entire precomputed array must be included with the app, but it is at most a few hundred kilobytes.
Conclusion
Conclusion 1: not an award-winning app.
Conclusion 2: LiveCode let us make a working, useful app in a few minutes.
Conclusion 3: Since I wrote it, I trust it 1.
There are many obvious improvements: if ever we want to sell or give away this app, we must write code to make it adapt to the various screen sizes of mobile devices. We might introduce a choice of colours, a wheel with degrees on it, etc. etc.
All of this can be done, and easily too. The point of this page was to show how incredibly fast LiveCode let us get something working that was actually usable.
We spent far more time on the design of the interface and the mathematics of the needle than on the code or debugging.
And that is the main advantage, to me, of using LiveCode: I can concentrate on the problem instead of having to battle with coding.
1: well, I trust my code, but I still have to trust the LiveCode compiler, the Android OS and the Samsung hardware. Any of these might include something that abuses my privacy, identity and so on. However, all the "free" compass apps I downloaded for trials included access to one or more of: my contacts, the GSM phone network, the internet, the GPS location, advertising, and so on. Perhaps some apps did not actually use them, just like Android will tell you my app uses coarse location when in fact it only uses the magnetometer part of that code library. But I cannot be certain.