A LiveCode tool to quickly build ALL icons and splashscreens for iOS
.
Background
I recently starting to build an iOS app Timesheet app using Google Spreadsheets. I hadn't worked with the iOS settings for 6-8 months and this picture is what confronted me as I first opened the iOS Standalone settings.
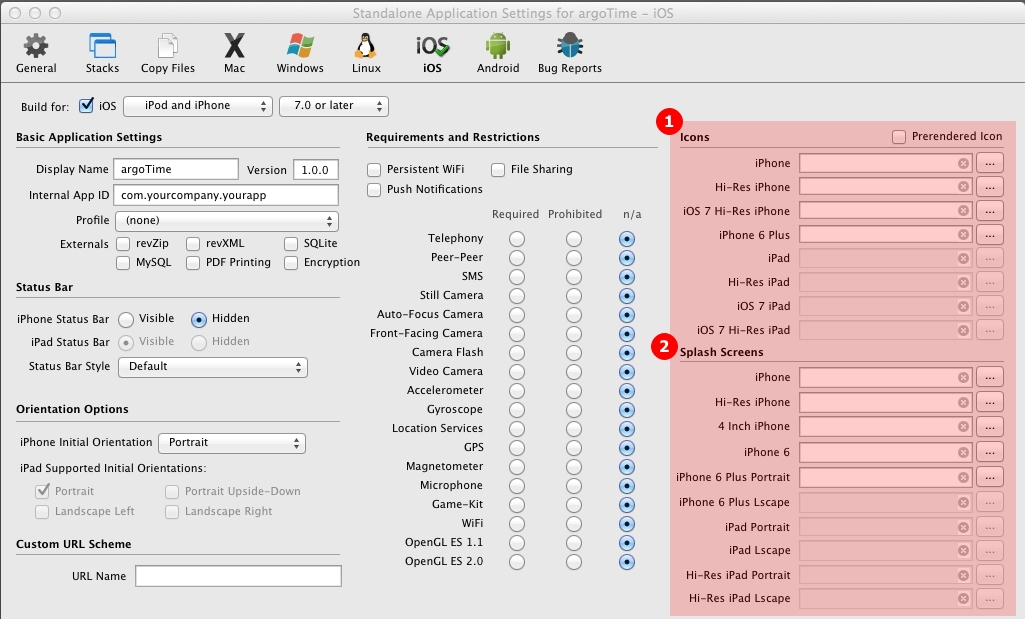
In particular, I was most concerned with the number of new `1` Icons and `2` Splash Screen files I would have to create. Ouch, 18 total files! And how to figure out what files size of PNG to put for each?
I posted online some questions and didn't get back all the answers I was looking for. I did more research, but never did find WHERE all the icon and splash screen sizes were documented.
Finally I figured out if you load the WRONG PNG size into the Standalone builder, it will tell you the correct size! So, using that information, I created this table.
Icon and Splash Screen Sizes
| Icon |
Sizes |
| iPhone |
57x57 |
| iOS 7 Hi-Res iPhone |
120x120 |
| Hi-Res iPhone |
114x114 |
| iPhone 6 Plus |
180x180 |
| iPad |
72x72 |
| Hi-Res iPad |
144x144 |
| iOS 7 iPad |
76x76 |
| iOS7 Hi-Res iPad |
152x152 |
| splash screens |
sizes |
| iPhone |
320x480 |
| Hi-Res iPhone |
640x960 |
| 4 Inch iPhone |
640x1136 |
| iPhone 6 |
750x1334 |
| iPhone 6 Plus Portrait |
1242x2208 |
| iPhone 6 Plus Lscape |
2208x1242 |
| iPad Portrait |
768x1024 |
| iPad Landscape |
1024x768 |
| Hi-Res iPad Portrait |
1536x2048 |
| Hi-Res iPad Landscape |
2048x1536 |
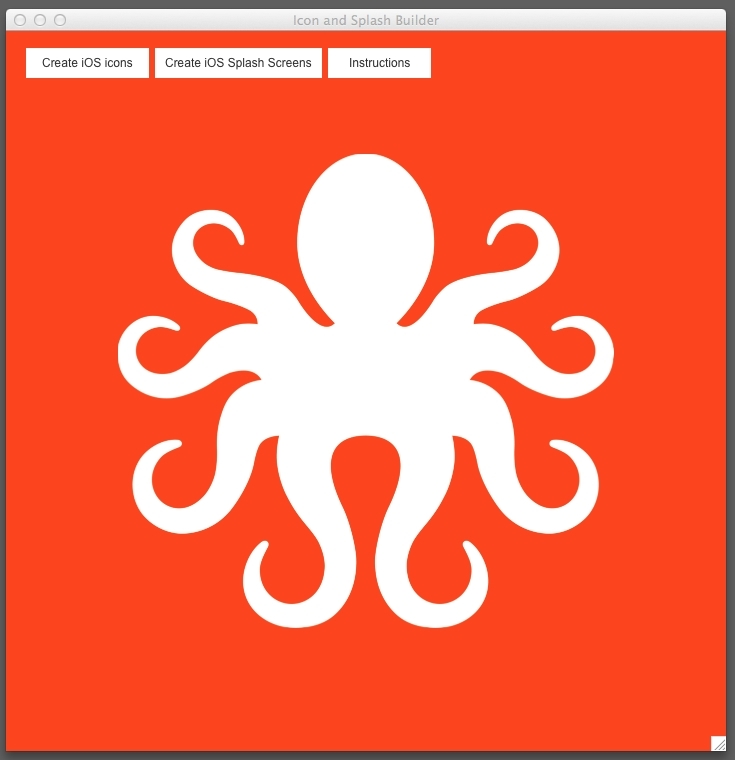
GREAT, now we're getting somewhere. Still the list was quite daunting. I realized all I really wanted was the argodesign logo (an octopus) on each of the icons and splashscreens.
In fact, if I recall correctly, the iOS guildelines specifically prohibits logotypes (logos comprised of type) from being used as icons, so I knew this was a pretty good direction for a design.
Finally, I decided rather than build all the images and resizing them in Photoshop, I would do it myself in LiveCode. So, in under an hour I had a simple tool which would do exactly what I wanted.
How to use it
First, download the stack.
Just open it up inside LiveCode. (FWIW, I decided NOT to make an altPlugin of it as it's so simple and not often used.)
So the idea is you import a high-resolution transparent PNG (~ 1000px x 1000px), then scale it down and center it on the card (the script centers it automatically). Next, group it. This is important as we will show later.
Make sure there is only ONE image and ONE group on the card or this doesn't work!
Next, be sure and set the backcolor of the card to the color you would like to see as the background of your icons and splash screens.
Finally, just press either button: Create iOS icons or Create iOS Splash Screens
After some initial checking to make sure everything is right, you are asked for a filename for your icons or splash screens. The program then automatically resizes the stack window and it's contents to each of the designated sizes and saves out the correctly named PNG in the filepath you designate.
How it works
All the code but the one line button handlers resides in the stack script:
on createPics pType
if not exists(img 1) then
answer "You need to have a single image on this stack!"
exit to top
end if
if not exists(grp 1) then
answer "You need to have your image in a GROUP!"
exit to top
end if
set the opaque of grp 1 to true
set the lockloc of grp 1 to true
put the rect of grp 1 into tGrpRect
if the loc of img 1 <> the loc of this cd then
answer information "centering image."
set the loc of img 1 to the loc of this cd
end if
put the rect of img 1 into tImgRect
put the width of img 1 into tImgW
put the height of img 1 into tImgH
if the number of controls on this card >5 then
answer information \
"Can only be ONE image on this card + the buttons!\
No text fields. No graphics. Cannot Proceed."
exit to top
end if
put the rect of this stack into tStackRect
put the topLeft of this stack into tTL
put the width of this stack into tStackWidth
ask file "Export picture as:" with type "PNG File|png|PNG"
if the result is "cancel" or it is "" then exit to top
put it into tPath
if char -4 to -1 of tPath is not ".png" then put ".png" \
after tPath
set the filetype to ""
set the resizeQuality of img 1 to "best"
set the resizable of this stack to false
if pType is "icons" then
put \
"57x57,72x72,76x76,114x114,120x120,144x144,152x152,180x180" into tIconSizeItems
else
put "320x480,640x960,640x1136,750x1334,1242x2208,1136x640,\
768x1024,1024x768,1536x2048,2048x1536" into tIconSizeItems
end if
repeat with x=1 to the number of buttons
hide btn x
end repeat
repeat for each item i in tIconSizeItems
set itemDel to "x"
put min(item 1 of i,item 2 of i) into tDiv
put tStackWidth/tDiv into tRatio
set the width of this stack to item 1 of i
set the height of this stack to item 2 of i
set the rect of grp 1 to the rect of this card
set the width of img 1 to tImgW/tRatio
set the height of img 1 to tImgH/tRatio
set the loc of img 1 to the loc of this cd
put createPNGname(tPath,i) into tNewPath
put the rect of this stack into tRect
wait 1 second with messages
export snapshot from grp 1 to file tNewPath as PNG
set itemDel to ","
end repeat
repeat with x=1 to the number of buttons
show btn x
end repeat
set the resizable of this stack to true
set the rect of this stack to tStackRect
set the rect of grp 1 to tGrpRect
set the rect of img 1 to tImgRect
end createPics
function createPNGname pPath,p
set itemDel to "/"
put last item of pPath into tName
delete last item of pPath
delete char -4 to -1 of tName
put "_" & p & ".png" after tName
put "/" & tName after pPath
return pPath
end createPNGname
Here are a few items of interest:
1. There is some error checking for correct number of controls.
2. `set filetype to empty` Automatically helps Macs create correct filetype and creator codes.
3. `set the resizeQuality of img 1 to "best"` Important to use the best resizing algorithm for rendering out images. It takes quite a bit longer, but the quality is superior.
REMEMBER: Set `resizeQuality` to "good" not "best" when you are resizing images for mobile.
4. `set itemDel to "x"` Since we're parsing our different icon and screen vars, and since their items look like `57x57` and `320x480` it's easy to just set the item delimiter to x. The potential problem is the statement just above: `repeat for each item i in tIconSizeItems`. If we don't reset our itemDel before our next repeat, LC won't understand the next item. So, at the end of the repeat handler we do just that: `set itemDel to ","`
5. `wait 1 second with messages` Turns out *SOMETIMES* you need to wait a bit after resizing to make sure everything is *complete.* I found out without this command, on occasion there were partial captures. Besides, it's OK to see it happen a bit slower!
UPDATE: Turns out the problem comes when capturing an explicit rect on the card. Not so much with group rect captures.
6. `export snapshot from grp 1 to file tNewPath as PNG` This is the juice that make it all happen effortlessly. Typically the `export snapshot` command will only capture what's *SEEN* on a card. So any overlapping windows, card width issues, etc. will be shown. Not good. Especially since we will sometimes grow the stack rect to larger than some screen sizes. Using the `from grp 1` form tells LiveCode to composite everything in the group and then export it regardless of what the stack window is doing. Works great with drop shadows and effects as well!
I hope this tool helps some of you as much as it has me!
And now, a ChippTip bonus. A discussion about...
Bonus: Using Helvetica Neue in iOS
Apple went out of their way in iOS7 to create numerous weights of their flagship Helvetica Neue font. They use each weight for specific controls. Typically, the *Larger* the font is, the *Lighter* the font. So, a time, for instance, shown at 24 pixels high might be Helvetica Neue *Light*, whereas the same data presented at 60 pixels high may be Helvetica Neue *Thin*.
Unfortunately, I couldn't find an easy way to map the Mac versions of these fonts to their iOS counterparts. After a bit of sleuthing and tireless testing, I figure out:
Helvetica Neue fonts need to be set thusly:
For setting a fld's font to Helvetica Neue Light in iOS:
`set the textfont of fld 1 to "HelveticaNeue-Light"`
So, here are the variations of Helvetica iOS which can be set:
HelveticaNeue-UltraLight
HelveticaNeue-Thin
HelveticaNeue-Light
HelveticaNeue
HelveticaNeue-Medium
HelveticaNeue-Bold
HelveticaNeue-Bold Condensed
HelveticaNeue-Black Condensed
It should be noted, many other fonts work the same way. You have to test and check. I suspect LC will get around to some sort of font-mapping, but for now, here's how I'm handling the Helvetica Neue issue in my projects.
On my `initMe` handler, I do:
`if the environment is "mobile" then altUpdateFontsFor_iOS`
and the handler:
on altUpdateFontsFor_iOS
lock screen
lock messages
repeat with x=1 to the number of cards in this stack
repeat with y=1 to the number of controls on card x
try
get the textfont of control y of cd x
if it contains "Helvetica Neue" and the environment \
is "mobile" then
set the textfont of control y of cd x to \
fixHelveticaNeue(it)
end if
end try
end repeat
end repeat
unlock messages
unlock screen
end altUpdateFontsFor_iOS
private function fixHelveticaNeue pFontname
put "-" into char 15 in pFontname
delete character 10 in pFontname
return pFontname
end fixHelveticaNeue