| This lesson shows you how to create stationary animated overlays. You can download the sample stack here.
Introduction An animated overlay, also known as a sprite, is a confined graphical object that changes its visual appearance as a result of cycling through a sequence of graphical updates or as a result of external influences.
For example, a sprite could represent an airplane with flashing lights on the wings. These lights would be animated to flash repeatedly in an indefinite loop. The behavior of a sprite may be environment dependent and change, for example if the airplane prepares for landing and the landing gear is displayed.
This lesson shows you how to create two sprite objects. One cycles through a sequence of images in an indefinite loop, the other changes the image display based on button inputs.
Image Sequence for Indefinite Loop
The image sequence in this step shows a space ship that is to hover and display a cyclic change of the lights below it.
Image Sequence for Environment Dependent Update
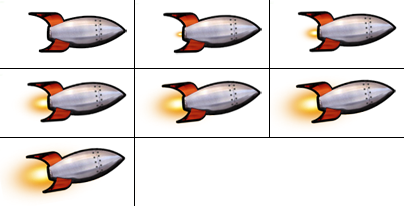
The image sequence in this step show a rocket in a number of boost stages. The elevation of the rocket increases with the size of the flame.
Importing the Images
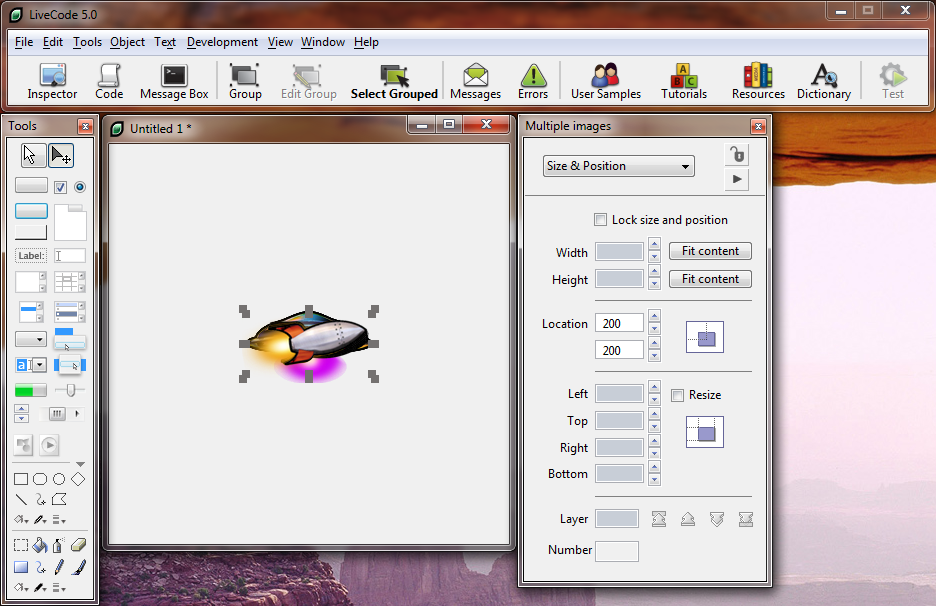
To start an animation of any kind, first import the images that are to be animated. Select File -> Import As Control -> Image File... to open the File Selection Dialog. Then choose the images you would like to use in your sprites. You can select all of the files at once or you can select them individually. This loads the images into the center of the card. The images should remain on the card, as this allows them to be displayed faster, but they have to be moved to a region that is not visible to the user. Open the Property Inspector and select the Size & Position drop down option. You should be able to change the location of all images at the same time, if you did not move them after loading them. In this example, the images are located at position 200,200. Increase the value to 2000,2000, in order to move the images into a region that is not displayed.
Creating the Animation Buttons Drag and drop two push buttons onto the card. These buttons are used as vehicles on which to animate the sprites.
Open the Property Inspector for the button that should display the space ship and select Basic Properties from the drop down list. Name that button "enemy" and untick all the check boxes, except for Visible. Select Icons & Borders from the drop down list and untick all the check boxes. Repeat the same steps for the button that should display the rocket, but name that button "rocket". You should find that the buttons are now not visible anymore.
Creating the Start/Stop and Boost Buttons Drag and drop two push buttons onto the card. These buttons are used to start/stop the animation loop and boost the rocket.
Open the Property Inspector for the start/stop button, name it "OnOff" and set the label to "Start". Then open the Property Inspector for the boost button, name it "Boost".
Adding Code to the Buttons The code for this example is contained in the card script and only one button contains code. Open the Script Editor for the boost button and add the following code:
on mouseStillDown
// Pass the mouseStillDown message to the card.
// This message must be passed explicitly by the control that receives it,
// as the message is not normally passed along the message path.
pass mouseStillDown
end mouseStillDown
The mouseStillDown message is called continuously at set intervals, if the button remains clicked. This allows you to detect if the user is boosting the rocket for a prolonged period with one click, rather than having to select a button repeatedly.
Adding Code to the Card The card contains all the code that is needed to animate the sprites. This includes global variables that store snapshot values of the animation, the commands that perform the animation, the message handlers that handle mouse clicks and the main scheduling loop that ensures the animation runs at the required speed and intervals.
Global Variables The variables maintain information that is relevant to each iteration of the animation. Data in these variables is updated by the animation commands and the button event handlers.
// Set up local variables for current states of the animation.
local sRun // The animation is running.
local sEnemyImg // The sequence number of the current enemy image.
local sEnemyRedrawIntervalCount // The number of scheduling cycles
// remaining before moving to the next enemy image.
local sRocketImg // The sequence number of the current rocket image.
local sRocketRedrawIntervalCount // The number of scheduling cycles
// remaining before moving to the next rocket image.
Resetting the Environment The global variables defined in the previous step contain information that is specific to an animation interval. This information is reset when the card is started up or between stop and start intervals of the animation.
// Set up the default values for the environment.
on preOpenStack
set the idleRate to 50
put false into sRun
put 1 into sEnemyImg
put 0 into sEnemyRedrawIntervalCount
put 1 into sRocketImg
put 0 into sRocketRedrawIntervalCount
end preOpenStack
The Mouse Events The mouse events are processed by two mouse event handlers. The mouseUp event handler processes button selections that start and stop the animation.
// Handle mouse up events for the Start and Stop button.
on mouseUp
if the short name of target is "OnOff" then
if sRun is true then
set the label target to "Start"
// Set the run loop to false.
put false into sRun
else
set the label of target to "Stop"
// Reset the environment.
preOpenStack
// Set the run loop to true.
put true into sRun
// Execute the main run loop.
mainEventLoop
end if
end if
end mouseUp
The mouseStillDown event processes the boost button and ensures that the rocket booster images are displayed in increasing order.
// Handle prolonged clicks of the Boost button.
on mouseStillDown
if sRocketImg < 7 then
// Increase the rocket image number.
add 1 to sRocketImg
end if
end mouseStillDown
Animating the Space Ship The space ship is animated by looping through a sequence of space ship images. Once the sequence has come to an end, the animation starts from the beginning. animateEnemy animates from one image to the next and does not run through all of the images at one time. The rate of image update is governed by the delay interval in the scheduling code and by the redraw interval count. This count determines after how many scheduling intervals the space ship sprite is updated. In this example, the space ship sprite is updated after five calls to animateEnemy.
// Animate the enemy space ship.
on animateEnemy
// Allow for five scheduling cycles before
// drawing the next enemy space ship image.
if 5 > sEnemyRedrawIntervalCount then
add 1 to sEnemyRedrawIntervalCount
else
put 0 into sEnemyRedrawIntervalCount
// Loop through the enemy space ship images,
// once the last one has been reached.
if gEnemyImg is 6 then
put 1 into sEnemyImg
else
add 1 to sEnemyImg
end if
// Set the new enemy image.
set the icon of button "enemy" to "enemy_" & sEnemyImg & "_.png"
end if
end animateEnemy
Animating the Rocket The rocket animation is not automatic and depends on user interaction. If no interaction takes place, the rocket is not animated. If interaction takes place the rocket is animated, with animation taking place for some time after interaction stops. The animateRocket command also uses a delay interval and draw interval count to determine the rate at which rocket boost animations need to be updated. This value is set to 2, allowing animation changes to take place faster than they do with the space ship animation. If the rocket image index is greater than 0, draw the image and subtract 1 from the rocket image index. No more rocket image updates are made once the rocket image index reaches 0.
// Animate the rocket.
on animateRocket
// Allow for two scheduling cycles before drawing the next rocket image.
if 2 > sRocketRedrawIntervalCount then
add 1 to sRocketRedrawIntervalCount
else
put 0 into sRocketRedrawIntervalCount
// If the rocket image number is greater than 0,
// draw it and reduce the image index count.
// We do not redraw the rocket if it is not firing.
if sRocketImg > 0 then
set the icon of button "rocket" to "rocket_" & sRocketImg & "_.png"
subtract 1 from sRocketImg
end if
end if
end animateRocket
Scheduling the Animation The animation is scheduled by a very short cycle. This cycle calls the animateEnemy and animateRocket commands, then waits for a specified number of milliseconds and calls mainEventLoop. The wait condition allows mouse button messages to be handled during the wait period, in order to catch start/stop and boost requests.
// Main control loop.
on mainEventLoop
// Continue this loop until gRun is set to false.
lock screen
animateEnemy // Animate the enemy space ship.
animateRocket // Animate the rocket.
unlock screen
// Delay further execution by 50 milliseconds.
// But allow button clicks to be processed.
if sRun is true then
send "mainEventLoop" to me in 50 milliseconds
end if
end mainEventLoop
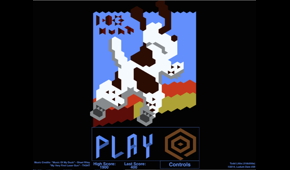
Running the Animation
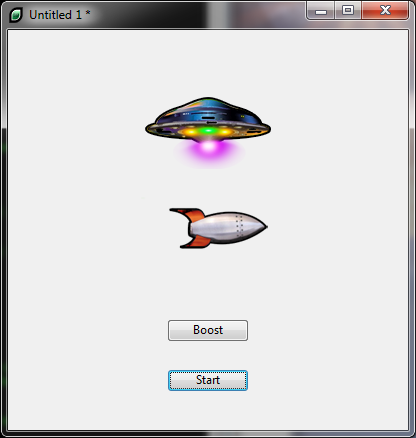
Once you have implemented the controls and added the code, you should have something that may look like the image shown here. The start button activates the animation of the space ship and allows you to press the boost button that tilts the rocket and increases the flame from the rocket booster.
If you would like to add motion to the sprites, then have a look at the lesson: How do I add Motion to Animated Overlays?
|