rIDE is a free, open-source alternative IDE for LiveCode. It’s aimed at increased productivity through a feature rich, yet intuitive, user interface and workflow.
rIDE has a small screen footprint where most of the windows used during development are integrated into one single window.
The Browser Tree
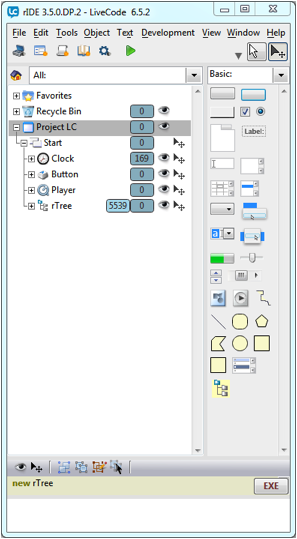
At the heart of rIDE is the browser tree. From there you can inspect and edit all aspects of all stacks and their controls.
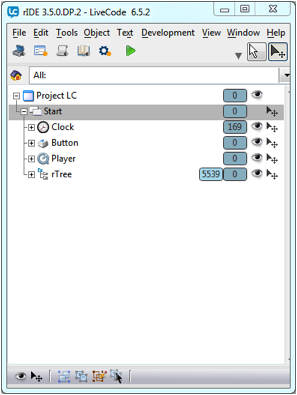
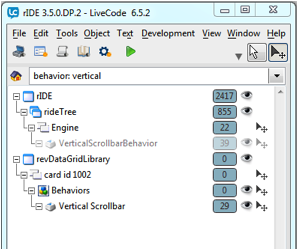
The browser tree has full support for drag-and-drop and you can re-arrange stack, cards, groups and controls freely. You can make stacks sub- or main stacks and re-arrange, move and copy cards and controls as well as re-layering groups to make nested group structures. The tree browser also has an extensive context menu for quick access to the most common actions of the different controls. From the context menu you can access many time saving features like expanding or collapsing all siblings of a node or importing a snapshot of the selected controls. One or more nodes can be “isolated” to create a clean, uncluttered overview of the stacks and objects you’re working with. The nodes in the tree can be filtered by categories or free text searching. The image below shows a search for Behavior buttons with “Vertical” in their names.
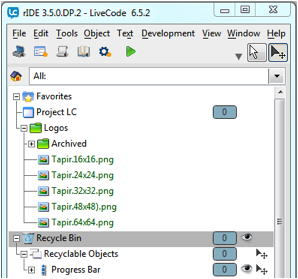
The browser tree can display nodes representing other resources such as, for example, a “Favorites” and a “Recycle Bin” node. The “Favorite” node can be used as a repository for stacks or specific controls that you are working with at the moment. You can place your favorites from the context menu or by drag-and-drop. The “Favorite” node can also display resources from your hard disk; for example you could display a folder with images on your hard drive and drag-and-drop those images directly onto your stacks. The “Recycle Bin” can be used to store deleted objects which later can be recovered with their original ID.
The tree can also display and let you edit your tools, object properties, global properties and variables as well as backScripts, frontScripts and stacksInUse. The tree structure can be reset from filtered and isolated nodes to display all nodes again by hitting the “Home” button.
From the context menu you can access features like expanding or collapsing all siblings of a node or importing a snapshot of the selected controls.
The Main Menu
At the top of the application is a standard text based main menu which covers all the aspects of LiveCode accessed from the main menu. Below the main menu sits an icon based “main controls” menu; from there you can toggle the visibility of the Tools, Inspector, Script, Dictionary and Preference windows. This makes it quick and easy to display the main parts of the IDE and get them out of the way when they are not needed.
At the right of the “main controls” menu you have controls to expand or collapse the whole main window to quickly minimize and free up maximum screen space or expand to show all panes in the main window. Also located here is the main Tool switch to let you toggle between “run” and “edit mode. In rIDE you can also switch between run” and edit mode by hitting your middle mouse button.
The Tools Pane
To the right of the Browser Tree there is a Tools pane. The Tools pane displays all your native and custom controls. The pane is re-sizeable and the controls can be filtered by categories or free text search. From the pane you double click or drag and drop a control to place it onto your stacks. You can easily make your own custom controls by choosing “Custom Control” from the context menu. Your new Custom Control will automatically be categorized, searchable and accessible by drag and drop for inclusion in your projects.
Multi-Selection Menu
At the bottom area of the main window you’ll find a multi-selection menu pane. From here you can perform tasks on multiple selected controls. Some examples are toggling of visibility and the “cantSelect” property. You can group, ungroup and edit groups and their controls as well as control geometry, positioning and alignment of multiple controls.
Code Execution
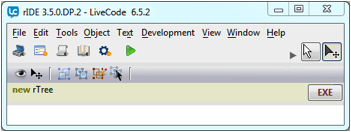
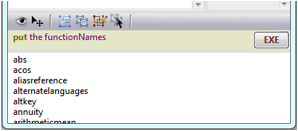
Finally, at the very bottom, you’ll find a “code execution and message pane”. From here you can execute one or more lines of code and watch the results as well as messages; you can even create custom controls with the same syntax that you use to create native controls. For example if you have a custom control named “myCustom” among your tools you can type “new myCustom” and the Custom control will be created in your top stack.
The Property Inspector
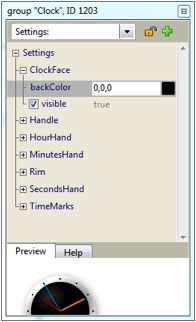
As a separate palette window you’ll find the Property Inspector. It’s accessed from the Main controls menu bar or by double clicking a node in the browser tree or the selected control. It can also be opened from the “node context” menu. In the inspector you can view and edit all built in control properties and global properties. You can also create, inspect and edit all types of custom properties. The inspector handles custom properties also in the form of multi-level arrays. You can select and filter what the inspector displays by choosing pre-defined categories and by free text searching. The properties and their values are displayed in a standardized way, where the inspector determines what type of property it is. So for example a property with the value of true or false will be displayed with a check box. A property where the value is a number will be displayed with a draggable control to increase or decrease the value. A property with a text value will have its value displayed in a scrollable field area. Properties with names ending in “color” will be displayed together with a color selector. A property with a name ending with “pattern” will display a pattern selector. And so on...
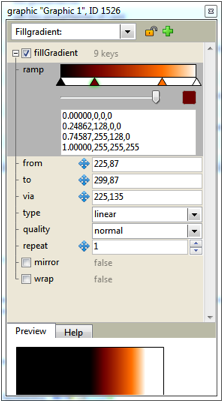
The inspector handles all aspects of fill and stroke gradients and displays all sub-properties in the fill- or stroke gradient array and their values. From the inspector you can control the gradient handles even when those extend outside the card. At the bottom of the inspector you will find a tabbed pane. From here you can choose a “preview” of the control being inspected or get help information related to the selected property.
All LiveCode All The Way
rIDE is built from the ground up all in LiveCode. Its core features and functions are independent from the LiveCode IDE and make use of the latest LiveCode engine features introduced in version 6.0 and later. The rIDE framework is built to be high performance and to handle all aspects of LiveCode. It is also designed to allow a plug-in architecture for new IDE components and features.
Join in!
I started developing rIDE as a private playground for how an alternative IDE for LiveCode could look and to see if rIDE could increase my productivity as a LiveCoder. Over time it developed into something I was using daily in my programming and I decided to share it with the community. The open source experience with other developers contributing their ideas, bug reports and solutions has been extremely rewarding and I have learned a lot! rIDE is free and too extensive for me to provide regular support. But I’m dedicated to continuing to develop rIDE and my hope is that it will be one small part of a larger community effort in creating a modern, flexible and high productivity IDE for our beloved LiveCode!
rIDE is a large project and even though it has come a long way already, it is far from a finished solution. And maybe an IDE should never really be finished!
If you’re not afraid to take it for a ride, just download the latest version from:
http://tapirsoft.on-rev.com
With my very best regards to all of you!
Mats Wilstrand |